25.8.11

Neutral, Party Make-up Tutorial!


Hey beauties!

Today I want to share with you my make-up which I am going to wear on my birthday in 2 weeks. Yes, I am one of such girls who is sooo excited about its birthday, so I even knowing now what I will wear.
Additionally, I will upload my Birthday Party Make-up, also my Outifts for both of these days!
This make-up is not really typical for me, because normally I go kind of dramatic for my birthday, but this year I decided for a really nice shimmery, natural, soft pink, brown look, which also works really well for a night out!
So let's get started!!

Products I used:
# Maybelline Eyestudio Duo 62 Mocha Mirage
# 88 Neutral Colour Eyeshadow Palette (please look at the picture for the exact colour)
# Alverde Eyebrow Pencil 01 Blond
# Essence Gel Eyeliner 02 London Baby
# Maybelline Color Sensational Lipstick 14o Intense Pink
# Lancôme Color Fever Gloss 321 Dangerously Pink
# Maybelline Dream Touch Blush o7 Plum
# Covergirl lashblastvolume mascara


Step 0: Before I started with my eye make-up, I concealed my eyes and blemishes and powered my face.

Step 1: Firstly I used the pinky colour of the Maybelline Eyestudio Duo and dapped it slightly over the whole lid with a normal eyeshadow brush


Step 2: Apply e/s no. 1 all over the lid (please look at the picture of the 88 neutral color eyeshadow palette)


Step 3: Apply e/s no. 2 just in the outer corner of your eye. Then start blending the eyeshadow, but try to stay with the colour just in the outer corner. Don't out it into your crease or up to your eyebrows! We want to keep it really natural.


Also, I applied a little bit of this colour under my eye.


Step 4: Define your eyebrows really softly! I just defined the edges.


Step 5: Highlight your inner eye and the area under your eyebrow with e/s no. 3


Step 6: Use a brown gel eyeliner to apply a really thin line as close to your lash line as possible. Just that your lashes look a little bit thicker.


Step 7: Use an eyelash curler and use your mascara.

Step 8: Now, we go to the lips. Use a soft pink lipstick and finish with a pink lipgloss with sparkles. Make sure that you just tap it softly onto your lips.


Step 9: Apply a pink cream blush on the apples of your cheeks. Firstly, apply a little dot and then blend it into your skin.


So that's it! Here a few pictures:


As I said, it's really natural, but I think it's really, really pretty, especially when you go out in the daylight, the eye is good a really nice shimmer, but not that you look like a disco ball :D
So, I hope you like it.

Please leave me a comment, if you love this look as much as I do or if you have changed anything!!
All the best!!! xx

24.8.11

Be Creative + Explanation!


Hey guys!
First of all, SORRY for being absent for a few months now!!!!
However, I want to explain what happend! Here in Germany, two weeks ago our summer holiday ended and they are just 6 weeks long btw :)
During the last three weeks of my precious holidays I became really ill. Normally this would be my "Posting-time", because the first three weeks I was in Switzerland, London & Paris. As I have already mentioned, I became really ill. Firstly I had to fight with a really strong food poisoning, which stayed there for the whole 3 weeks and additionally to that I became I huge cold. I think, it was a normal cold, but just because of the fact that my immunsystem was so low, it turned out to be the pure horror.
Then my next school year started and I completely underrated it. It's my year before last my school career ends and it is really hard! Here in Germany, especially here in Hesse, we have a really hard "Abitur", which is similar to the British A-Levels. So I have every day afternoon sessions and have to study and work a lot when I come home. Perhaps, I have got time to post a post each weekend, it will be unreguar in any case. So I want to apologize for that, but I do my best and, of course, also I don't want to neglect my school. My Message: I'm still there for you!!!! :)


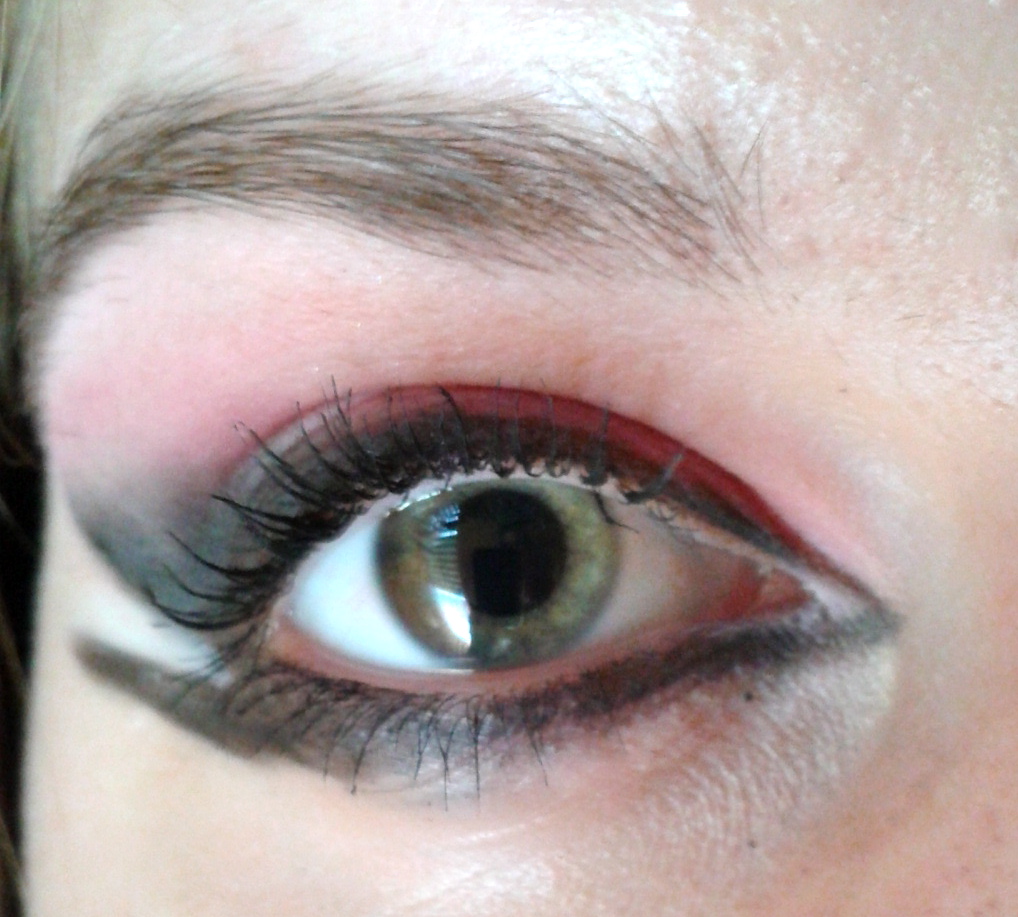
Anyway, I wanted to encourage you to experiment and to be creative with make up. You don't have to have an extact plan in your head, just grap your eyeshadows and a few brushes and just start. I have never believed in this plan, because I'm normally a strict planer :) Because of the fact that this week (btw, the only one in this whole year) is a little bit relaxed, I had time to "live my creativity" :) The result is what you see below. In the inner corner is a mixture of light pink and medium pink. In the centre of the light nearly until the eyebrow ist a bright pinky colour. In the crease is a more red,pink colour. The main part is the black eyeliner. It's a really dramatic, strong one and I also added a thin line underneath and untile the teat-dot area. Obviously, this is not an everyday makeup and I even wouldn't recommend this for the school, but it makes so much fun to do!! Just try it out, use your own creativity and create your personal, funky, extravagant look!

Have fun & See you soon!!!
xoxo


21.6.11

Mac Harmony - Swatches + Demo

Hey guys!

Some of you asked if I can show you a swatch of my MAC Harmony and what I think about it.
The product looks like this and costs 22€:


Firstly, you have to know that this powder is a contouring powder. This means that you apply it on certain party of your face in order to define it a little. The following picture give you a guide line. Obviously, you have to blend the powder into your natural skin tone really well.


The colour is really matt and has no shimmer. However it is not completely brown, but it is a more medium brown with a red under tone! Blended in the skin, it really adapts to my skin tone.


MAC's Harmony doesn't look so orange/red on the skin. Nevertheless, it has a slight red under tone! You have to apply this contour powder really softly, if you don't want to see the reddish, however you can't define your cheekbones very strong! So, I am not quite sure, if I really like that.


Here is a before/after picture:


Therefore, I wouldn't recommend applying this powder all over the face, but it's really good for a slightly and nice contoured cheeks!


Dupe!
If the MAC Harmony is too expensive for you, than I can just recommend the Sleek Contour Kit in medium. I made a review of this here. This is really a fantastic and cheap contour powder!

I hope this was helpful for you!
xx

11.6.11

Essence Gel Eyeliner Review (German/Deutsch)

Hey guys!
For my english readers: This review is going to be about the Essence Gel Eyeliner. This product is just available in Germany, Switzerland and Austria, hence it just makes sense when I'm writing this in German. I've you want to write this post, I can translate it in English, however. Just write me an email for this.

Jetzt in Deutsch :D Hallo meine Lieben!
Heute will ich eine Review über den Essence Gel Eyeliner 02 London Baby diesmal in Deutsch machen. Das Produkt ist ganz neu in das Standardsortiment von Essence eingeführt worden.

Insgesamt bittet Essence 4 verschiedene Farben an:


01 midnight in paris


02 london baby


berlin rocks


i love nyc

Die Firma selbst sagt dieses Produktversprechen:
"besondere (augen-)blicke erfordern besondere augenprodukte: und dazu gehört ab sofort auch der neue gel eyeliner von essence! seine ultrageschmeidige gel-formulierung lässt sich präzise wie ein flüssiger eyeliner auftragen und sorgt für ein besonders seidiges finish in den verschiedensten effekten von matt bis schimmernd. einfach die spezielle gel eyeliner brush von essence in den tiegel eintauchen und mühelos einen perfekten lidstrich ziehen, der schnell trocknet, langanhaltend sowie wisch- und wasserfest ist. für einen blick von faszinierender intensität!"

Ich habe die Farbe 02 London Baby, jedoch finde ich die anderen Farben auch sehr ansprechend. Da ich finde, dass brauner Eyeliner meinem Augen schmeichelt, habe ich diesen ausgewählt. Jedoch denke ich, dass der schwarze Eyeliner an blauen Augen sehr schön aussehen würde!

Verpackung: Das Design der Verpackung ist mit einfachen braun und silber Tönen sehr klassisch und wirkt mit dem Muster auch sehr elegant (siehe Bilder unten). Die Verpackung hat einen Durchmesser von 3,5cm, ist daher klein und rund. Der Deckel ist aus Plastik und lässt sich sehr leicht auf- und zuschrauben. Der Gel Eyeliner selbst befindet sich in einem runden Glasgefäß. Insgesamt sieht das Produkt nicht wie "Billigschminke" aus, sondern ist sehr seriös gestaltet.


Farbe: Nach dem Deckel zu urteilen, erwartet man ein normales, dunkles Braun, doch beim Auftrag erkennt man, dass er um einiges dunkler ist (s. Bild unten). Er ist eine Mischung zwischen dunkelbraun und einem Hauch von Schwarz. Zusätzlich hat er einen leichten Metallic-Effekt, wodurch der Eyeliner auch ein wenig silber erscheint. Diesen Metallic-Effect erkennt man auf dem Auge jedoch nicht mehr. Obwohl die Farbe dunkler als gedacht ist, gefällt sie mir sehr gut und wirkt nicht zu hart für mein Auge!


Konsistenz: Die Konsistenz des Gel Eyeliners ist halt wie bei einem klassischem Gel Eyeliner gel artig. Vom Auftrag her gehört er zu einem meiner besten Gel Eyeliners. In wenigen Sekunden kann man einen perfekten Eyeliner ziehen. Zusätzlich muss man nicht viel vom Produkt verwenden, um eine intensive Farbe zu erhalten.

Wasserfest/Wischfest: Ja, das ist er in beiden Fällen! Beim Auftrag muss man bei der Korrektur schnell sein, denn sonst wird es sehr schwierig den Eyeliner zu entfernen. Innerhalb kürzeste Zeit ist er wischfest und selbst meinen homemade Pooltest hat er überstanden :D Trägt man in morgens auf so bleibt auch bis abends an seinem Platz!

Preis/Leistung: Der Preis dieses Gel Eyeliners liegt bei 2.95€ bei 3ml. Ich finde, dass das Preis-Leistungsverhätnis hier auf jeden Fall zutrifft. In dem deutschem Drogeriemarkt gehört dieser zu den billigsten Gel Eyelinern, daher ich sein 24h-Halt beeindruckend.

Fazit/Empfehlung?: Ich kann definitiv den Essence Gel Eyeliner weiterempfehlen. Obwohl man zunächst vor Billigprodukten gerade an der Augenpartie große Vorurteile hat, hat dieser Gel Eyeliner gerade das Gegenteil bewiesen. Ich war persönlich selbst überrascht, dass der Eyeliner so gut aufzutragen ist und den ganzen Tag hält. Erst mit einem guten AMU-Entferner wird man den hartnäckigen Gel Eyeliner los :D Also: Absolut Empfehlenswert! Daumen hoch!!
Habt ihr auch den Essence Gel Eyeliner? Was denkt ihr über ihn?
Alles Liebe,
Eure thefirstgoldengirl

9.6.11

Hugh Haul!!!

Hey guys!

Recently I bought lots of clothes for the summer and spring, but I just had to have very very urgently some short, airy tops for a party. If you want to see a haul where I bought a massive amount of clothes then please write this as a comment!!!

However, which beautyfreak can't go into a drugstore without buying something for makeup!?!??! I just had a relapse, but I really limited my cosmetic hauls, because I want to invest into other stuff than makeup (clothes! :D)


Firstly, I want to show you my tops. I bought just a white and a pink basic top from which the white one is extremely transparent. So I bought a more wider, straight-cut top which you can wear on top of the first one and you can do a knot on the side.


Then, I just saw this really cool striped long shirt/dress. The cloth is gathered on both sides with a really cute list. You can wear it has a dress with a cool leggings or you can gather it a little bit more in order to wear it as a long shirt.


Then I bought this cosmetic:
# Balea Handcreme & Balsam in flavor chamomile
# teeny-weeny black elastic band (even if I don't have black hair :))
# Manhattan Go Big Eyeshadow Pen 35W
# Catrice Lipstick Ultimate Shine 110 Shy Flamingo
# Essence Lipstick 53 Half Baked Cupcake
# Max Factor Creamy Blush 18 soft cardinal
# Wellaflex hair mousse for waves & curls
# Balea peeling in flavor grapefruit


If you want to have a review on any of these products than please tell me that!!

xoxo
Related Posts Plugin for WordPress, Blogger...