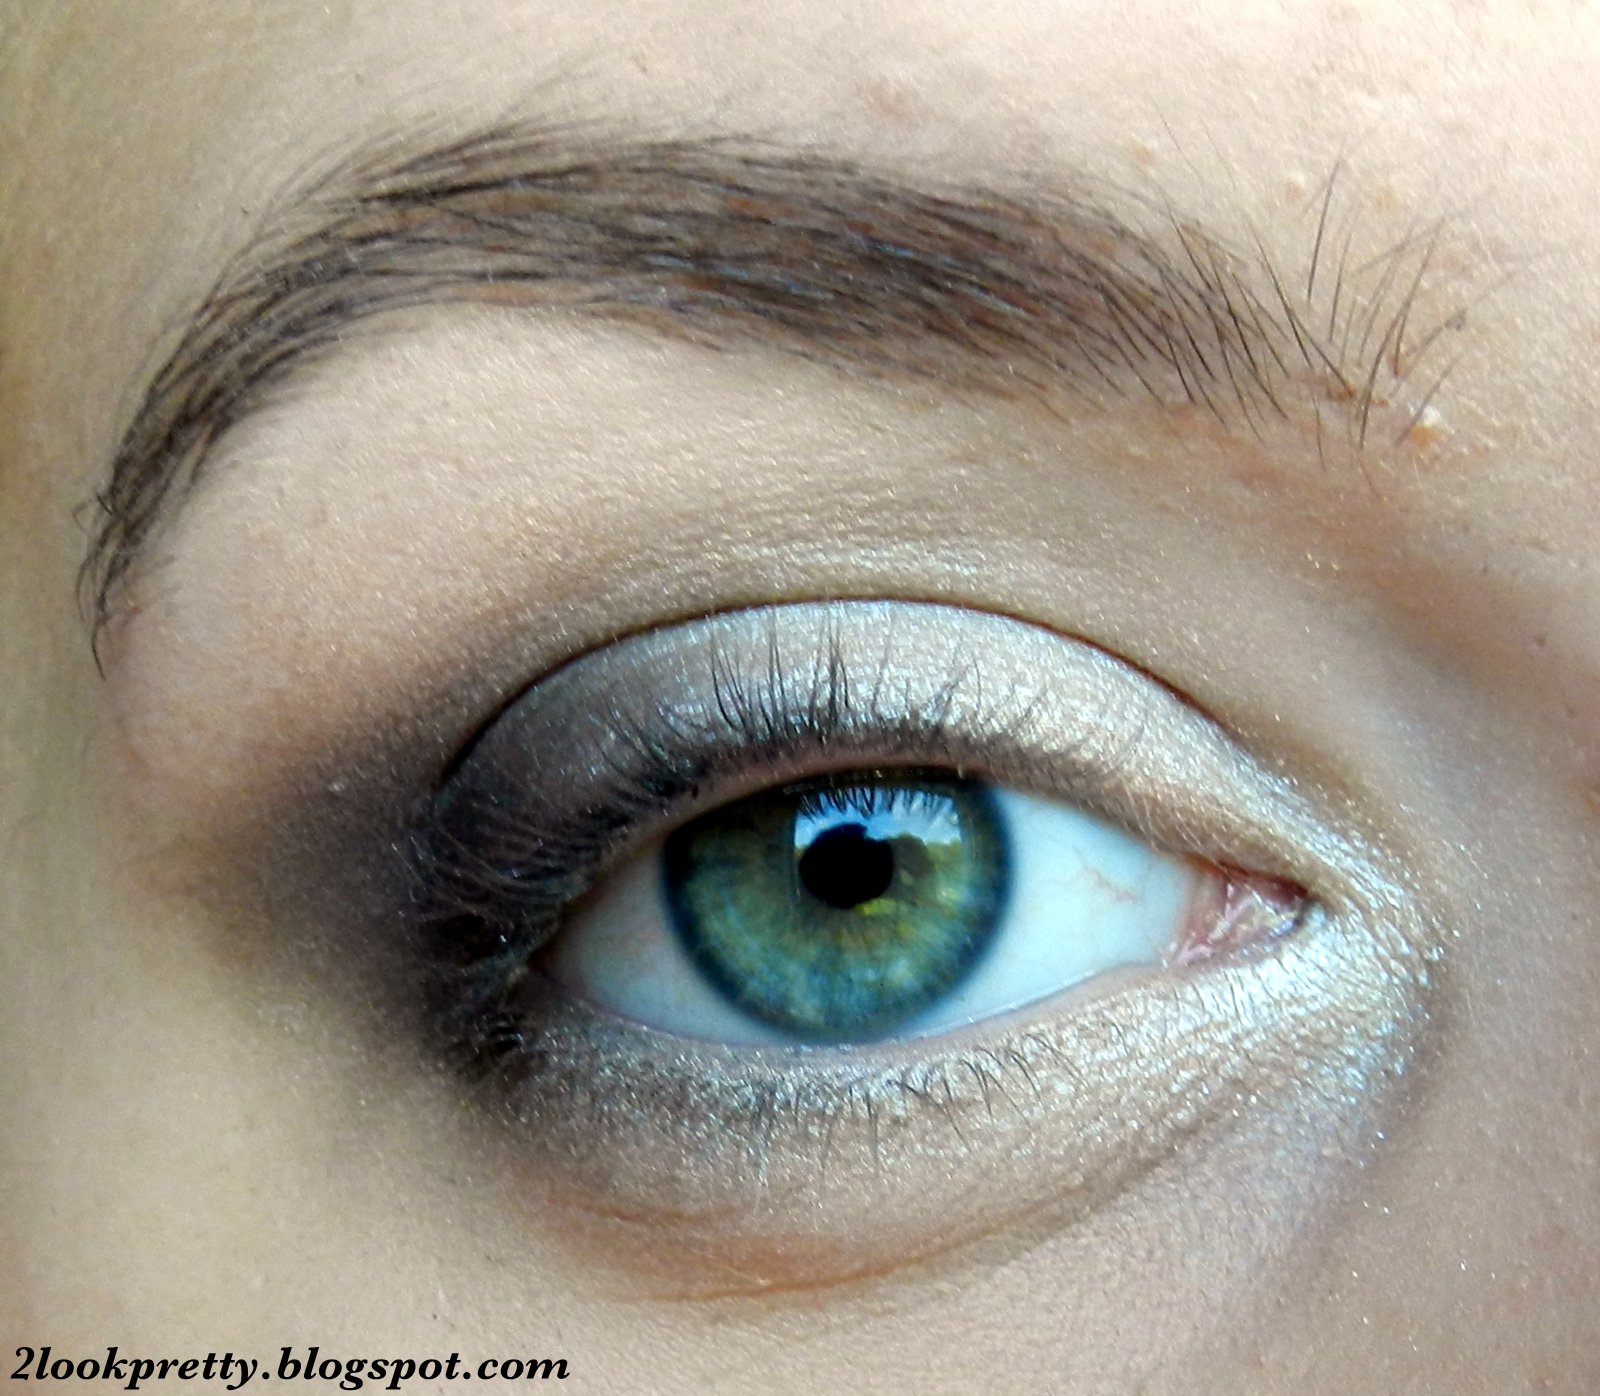
Inspired by my latest night outs and the upcoming long summer nights, I though I throw in a little Soft Brown & Pink Evening Make up which gives a slightly smokey look without being too strong and still wearable. By the way, I am so excited about the summer time as I have a lot of beautiful summer make up tutorials in my mind. Let me know in the comment section below whether you would like to see more make up tutorials! But let's get started!
1. Apply a light pink eyeshadow all over the eyelid after priming it.
2. Then I started to apply always a darker brown eyeshadow in the crease so that I slowly build up the colour. Also by layering the product, your eye make up will last the whole day.
3. Then I used a dark rusty brown and smudged it along the upper lash line.
4. Then apply a white eyeshadow in the inner corner of your eye.
5. Curl your lashes, apply mascara and that's it.
Overview - all eyeshadows
So that was my wearable smokey, soft brown & pink evening makeup. I hope you liked it and as I have already mentioned above, tell me whether you would like to see some summer make up tutorials and whether you prefer a stronger lip or a stronger eye during the night.
Hello everyone! How are you?
Welcome to the third part of my Prom Series in which I am exclusively going to talk about make up and which make up look I find the most flattering during prom. If you have missed my previous posts of my Prom Series about finding your perfect neckline (Link) and finding your perfect dress according to your body type (Link), then have a look there.
So, if you look in Youtube and type in you will find a lot of amazing Prom Make up looks from real make up artists or ordinary people that share tutorials for a makeup specifically for Prom. For example, Lisa Eldridge shows a professional look (Link) as well as the Pixiwoo sisters (Link) also with a red lip (Link). But because you can find these tutorials so easily, I want to show you other tutorials that are not primarily designed for Prom, but still absolutely appropriate for it.
Look #1 - The Classic Look
This is a very classic yet elegant and pretty make up that suits to every dress. It makes you look fresh and sophisticated and can also be combined with a red lip. By the way, this lady reminds me so much of Leighton Meester. :)
Look #2 - Demi Lovato Makeup Tutorial
This look is pretty similar to the one above except of the fact that the liner is much more thicker and heavier, thus, this look is a bit more dramatic and also focuses on a dewy skin. This look suits to any dress again and is perfect for you when you want to dramatize the classic make up a bit.
Look #3 - Amanda Seyfried Oscars Makeup Tutorial
Because of the purple eyeshadows, this make up is different than usual ones, but don't be afraid of using a bit of colour as this look still looks amazing and breathtaking. Even though there are no harsh liner or bold eyelashes involved, this look is absolutely striking. However, I wouldn't choose this look when you are wearing a dress in this colour range.
I would describe this look as being actually a wearable smokey eye for everyday, however, I find this look so flattering, sexy and outstanding that it is definitely appropriate for Prom. I can imagine this look being combined with a dress in warm colours or with golden details or worn by someone with a rather golden skin undertone.
Look #5 - Jennifer Lopez Makeup Tutorial
As this is by far one of the best make up tutorials on youtube, it shouldn't be left out in this Prom make up idea list. This is a beautiful, brown and golden dramatic eye make up that suits to a dress in warm colours or with golden details again. It is a unique version of a regular brown smokey eye and will make you appear elegant, but sexy in the same time.
So these were my make up ideas for Prom. I still haven't decided which of these I am going to pick for my graduation party and in fact, I have to choose two make up looks as I have to attend to two graduation events which, however, are on the same day. But that's another story. So I hope you found this a bit helpful and tell me which make up look do you like to wear on official evening parties?
Today I want to show you a beautiful taupe make-up that I came up with this morning and just suits perfectly to this rainy melancholic winter and autumn days. It really gives me a slightly mystery, sultry feeling and it csn be easily vamped up with a few darker taupe colour in the crease. The look includes my new Essence Quattro 07 Over the taupe palette and if you want to know how you can get that make-up look, then keep on reading.
Guide
1. Apply the right colour from the top and the left colour from the bottom of the Essence Quattro 07 Over the taupe palette all over the lid.
2. Blend a light matte ashy brown into your crease and a darker golden, ashy brown in the really outer part of your eye.
3. Take the first colours from the Essence Quattro 07 Over the taupe palette under your eye.
4. Highlight your inner corner and your brow bone with a glittery rosy eyeshadow.
5. Then I took my black gel eyeliner and drew a line on top of my lash line and winged it out at the end.
6. Curl your lashes & apply your favourite mascara and you are done!
For this look a light coral blush will look best. I used the NYX blush in Mauve.
Because the eye make-up is quiet strong for everyday I kept my lips really natural with a rosy lib balm.
So this is the look I was wearing today. I really like this look especially for this season. What do you think about taupe colours during the autumn and winter season?
Hey guys! Fall is starting and when the weather gets cooler I always start to wear more make-up especially on the eyes. So I came up with a lightly more intense green smokey eye makeup. It is actually a lot more intense and greener than on the picture below. So let's get started!
The tutorial:
Eyes:
1. Apply a light beige shimmery eyeshadow all over the lid and in your inner corner.
2. Apply a medium green eyeshadow with a golden undertone to the outer half of your eyelid
3. Apply a golden eyeshadow to the middle of your eyelid
4. Use a really dark green eyeshadow and pat it onto your crease. Start blending it, but stay in the really outer part of your eye and elongate it towards your eyebrow.
5. Apply a white matte eyeshadow under your brow bone
6. Apply the darkest green colour to the outer part on your bottom lash line & the golden colour in the middle of your bottom lash line
7. Draw a black winged liner with a liquid eyeliner
8. Curl your lashes, apply mascara and your done with the eyes.
Face:
I would apply a sheer blush that just sculpts the face and doesn't take away the attention from the eyes, e.g. Sleek Suede Blush.
Lips:
I went for a nude, but not dead nude lip. I used P2 Pure Colour Lipstick in 02 Sunset Boulevard and Esprit Lipgloss in Beige on top.
And that's it. Of course, this look isn't that natural, but I seriously received a lot of compliments because of this look. So please try it out & tell me do you like to wear heavier makeup when it is getting colder outside?
Momentan ist bei den amerikanischen Youtubern die 20$ Make-up Challenge beliebt. So langsam fangen nun auch die deutschen Youtubern damit an, jedoch wollte ich diese 20€ Make-up Challenge hiermit populärer machen und sie auch in die deutsche Bloggerwelt bringen. Die Challenge ist schwieriger als ich erst dachte und ich muss sagen, dass es mir recht schwer gefallen ist, auf unter 20€ zu kommen. In den 20€ muss nicht nur die Kosmetik an sich, sondern auch alle Utensilien (Pinsel usw.) dabei sein.
Die Produkte
Beschreibung
Menge
Stückpreis
Preis
Essence Stay all day make-up
1
3,95 €
3,95 €
Rossmann Mineral Powder
1
2,99 €
2,99 €
Essence I Love Extreme Mascara
1
2,75 €
2,75 €
P2 intensive khol eyeliner
1
1,95 €
1,95 €
Rival de Loop Eyeshadow 11 cherry plum
1
2,49 €
2,49 €
Catrice Concealer Palette
1
3,45 €
3,45 €P
P2 cream lipstick Park Street (fehlt leider auf dem Bild)
1
1,95 €
1,95 €
Zw.-Summe
19,53 €
Gesamt
19,53 €
Zuerst habe ich die Essence Foundation Stay All Day auf dem ganzen Gesicht mit den Händen aufgetragen
Danach habe ich auch mit den Händen mit der Catrice Concealer Palette meine Augenringe und Unreinheiten abgedeckt.
Das ganze habe ich dann mit dem Rival de Loop Mineralpowder mit einem Schwämmchen aufgetragen, der schon beim Produkt dabei war.
Als Eyeshadowbase habe ich einfach den Catrice Concealer auf das ganze Lid aufgetragen.
Dann hab ich die rosane Farbe des Lidschatten Duos von Rival de Loop mit dem beigelegten Applikation auf das ganze bewegliche Lid und in den Augeninnenwinkel aufgetragen.
Der dunklere Ton kam dann in die Lidfalte wieder mit dem Applikation, wobei ich mit dem Finger noch versucht habe, alles so gut es geht zu verblenden.
Mit dem P2 Intense Khol Eyeliner habe ich eine Lidstrich am oberen Wimpernkranz gezogen und mit dem Schwammapplikator, welcher auf der anderen Seite des Liners ist, verwischt.
Dann hab ich noch die Wimpern mit der Essende I Love Extreme Mascara getuscht.
Als Lippenstift habe ich den P2 Park Street verwendet.
Diesen habe ich dann auch als Cremerouge leicht auf die Wangen aufgetragen.
So sieht also mein vollendeter 20€ Make-up Look aus. Obwohl ich zwischendurch beim Augenmake-up und ohne Pinsel am verzweifeln war, denke ich, dass sich das Ergebnis sehen lassen kann. Auf jeden Fall hat es sehr viel Spaß gemacht an dieser Challenge teilzunehmen und ich hoffe, dass auch ihr an der Challenge teilnehmt!
Unfortunately the summer holidays are over and we have to go back to school. What a better time to show you a simple, minimal make up that is more than a no-makeup makeup, but still toned down. If you want to have the perfect makeup for your first day in school, then keep on reading!
Products
+ Sleek Storm Palette light matt brown eyeshadow
+ Artdeco 520 matt medium/mushroom brown eyeshadow
+ Kiko 167 matt white eyeshadow
+ Essence dark brown to black gel eyeliner in 02 London Baby
THE makeup
Start by applying an eyeshadow base on your eyelids. This prevents your eyeshadow from creasing during a long school day. For this tutorial I used matt eyeshadows for a more natural and minimal look. Now apply the matt light brown eyeshadow all over your lids and start concentrating the colour a tiny bit into your crease.
Then take a slightly darker brown. I used the Artdeco 520 matt medium/mushroom brown eyeshadow and applied it into my crease. Blend it a with fluffy crease brush so that the darker colour looks like a natural shadow.
Also apply a little bit of the darker brown on the outer part of your lash line below.
Then apply a white matt shadow in the inner corner of your eye. This brightens up your look and makes you appear more awake.
Take the Essencedark brown to black gel eyeliner and draw a tiny line as close to the lash line as possible with an angled brush. Once you've reached the outer part of your eye, elongate the line for a tiny bit and connect it to the rest.
The eyeliner should be really minimal, just with a tiny flick so that your lashes appear thicker. Also the colour of this gel eyeliner is perfect, because it is neither to bold nor to invisible like a black or a light brown can often be.
Curl your lashes and apply mascara. I prefer two coats. And that's it!
According to the season I would just apply a tiny bit of bronzer on the apples of my cheeks and a lip balm.
Remember, you are young and you don't need a ton of makeup. You don't have to mask your face! I hope you liked this tutorial.
Please let me know when you have to go back to school?